We use the following branching strategy in this project
Master Branch: master
We consider master to be the main branch where the source code of HEADalways reflects a stable application. This is the branch from which all feature branches are forked, and into which all feature branches are merged.
Changes to master should always come through a pull request!
Feature Branches: feature-*
Feature branches are used to develop new features. The essence of a feature branch is that it exists as long as the feature is in development, but will eventually be merged back into master (to definitely add the new feature to the upcoming release) or discarded (in case of a disappointing experiment).
Feature branches should not exist in origin for very long. They should be merged into master, via pull request, as quickly as possible and then cleaned up.
Naming convention: feature-*
Branches from: master
Must merge back into: master
Code and structure
agreelance/ django project folder containing the project modules
core/ contains all the project templates
index.html One of the project templates that uses a template language to insert if, loops and variables into html.
home/ user profile – overview over user projects
static/ – contains static files like js and images
templatetags/ folder containing template tags. Methods you import into your templates. Can be used in combination with views.
admins.py – file contaning definitions to connect models to the django admin panel
views.py – Controller in MVC. Methods for rendering and accepting user data
forms.py – defenition of forms. Used to render html forms and verify user input
payment/ – module handling payment
projects/ – The largest module of the project containing code for creating project and tasks. Upload files, view files, adding roles and user to roles.
agreelance/ – The projects main module contaning settings.
static/ – common static files
user/ – module extending django’s user model with a profile contaning more information about the user.
manage.py – entry point for running the project.
seed.json – contains seed data for the project to get it up and running quickly
Installation with examples for ubuntu. Windows and OSX is mostly the same
Fork the project and clone it to your machine.
Setup and activation of virtualenv (env that prevents python packages from being installed globaly on the machine)
Naviagate into the project folder.
pip install virtualenv
virtualenv env
For mac/linux:
source env/bin/activate
For windows:
env\Scripts\activate.bat
If you get an error related to charmap on Windows, run this command:
set PYTHONIOENCODING=UTF-8
Install python requirements
pip install -r requirements.txt
Note: Mac users may get an error related to psycopg2. To fix this try running:
pip install psycopg2==2.7.5
Migrate database
python manage.py migrate
Create superuser
Create a local admin user by entering the following command:
python manage.py createsuperuser
Only username and password is required
Start the app
python manage.py runserver
Add initial data
You can add initial data either by going to the url the app is running on locally and adding /admin to the url.
Add some categories and you should be all set.
Or by entering
python manage.py loaddata seed.json
Email
Copy agreelance/local_settings_example.py to agreelance/local_settings.py and replace the email placeholder values with values dscribes in the email section later in the instructions.
To support sending of email you will have to create a gmail account and turn on less secure apps. Do not use your own email as Google might lock the account. See https://support.google.com/accounts/answer/6010255?hl=en for instructions for turning on less secure apps.
To get email working on heroku you might have to visit https://accounts.google.com/DisplayUnlockCaptcha and click continue as the heroku server is in another location and Google thinks it is a hacking attempt.
Continuous integration
Continuous integration will build the code pushed to master and push it to your heroku app so you get a live version of your latest code by just pushing your code to GitLab.
Fork the project at GitLab
Create a heroku account and an app.
Set the project in the .gitlab-cs.yml file by replacing <Your-herokuproject-name> with the name of the Heroku app you created
- dpl --provider=heroku --app=<Your-herokuproject-name> --api-key=$HEROKU_STAGING_API_KEY
Set varibles at GitLab
settings > ci > Environment Variables
HEROKU_STAGING_API_KEY = heroku > Account Settings > API Key
Add heroku database
Resources > Add ons > search for postgres > add first option
Set variables at heroku. Settings > Config vars > Reveal vars
DATABASE_URL = Should be set by default. If not here is where you can find it: Resources > postgress > settings > view credentials > URI
EMAIL_HOST_PASSWORD email password. Not mandatory if you do not want to send email
EMAIL_HOST_USER email adress. Not mandatory if you do not want to send email
IS_HEROKU = IS_HEROKU
On GitLab go to CI / CD in the repository menu and select Run Pipeline if it has not already started. When both stages complete the app should be available on heroku. Staging will fail from timeout as Heroku does not give the propper response to end the job. But the log should state that the app was deployed.
Log in to the Heroku CLI by entering heroku login. This opens a webbrowser and you accept the login request.
Migrate database by entering
heroku run python manage.py migrate -a <heroku-app-name>. Heroku run will run the folowing command on your heroku instance. Remember to replace <heroku-app-name> with your app name
and create an admin account by running
heroku run python manage.py createsuperuser -a <heroku-app-name>.
seed database heroku run python manage.py loaddata seed.json -a <heroku-app-name>
Reset Database
heroku pg:reset DATABASE_URL -a <heroku-app-name>
Data seeding
The data seed provided contains 3 users, described in Users section above
Functions for integrating analytics tools such as Google Analytics into web applications. 💖
💾 Requirements
Web Browser – Can be used as an emulator to build applications. Example [Chrome, Firefox, Safari & Opera].
Internet – Because many use CDN and to make it easier to find solutions to all problems.
🎯 How To Use
Example Syntax
const{ trackEvent }=require('./src/analytics');// Example usageconsteventName='Button Click';consteventData={buttonId: 'btnSubmit',page: 'homepage'};// Send event data to analytics servicetrackEvent(eventName,eventData);
Explanation
This package provides a simple way to integrate analytics tracking into your application. The trackEvent function allows you to send custom event data to your analytics service, such as Google Analytics, to track user interactions, button clicks, page views, etc.
Return Value
The trackEvent function does not return any value directly. It sends the event data to the analytics service. In the example provided above, it logs the event data to the console for demonstration purposes. However, in a real-world scenario, it would send the data to the configured analytics service.
Protoinject is a hierarchical dependency injection system. Unlike conventional dependency injection libraries which only concern themselves with the resolution of services, Protoinject manages the lifecycle of services and associated them into a hierarchy of objects.
This model allows Protoinject to seperate planning, verification and resolution of dependencies, allowing for many new scenarios such as:
Caching the planning results from the startup of your application, resulting in faster startup times.
Validating that all dependencies can be satisified before any objects are created, ensuring no side-effects occur if a request can not be satisified.
Creating custom plans from external sources, such as game levels. This allows you to verify that all objects in a scene have their dependencies satisified.
Navigating and querying the hierarchy at runtime, which maps extremely well to entity-component systems.
Getting Started
Protoinject is commonly used within Protogame. If you’re already using Protogame, then you don’t need to manually install this library; it is already available to you.
If you are not using Protogame, or you want to use Protoinject for general application purposes, you can install Protoinject into your project using Protobuild, like so:
Then reference Protoinject from your project, like so:
Copyright (c) 2015 Redpoint Games Pty Ltd

Permission is hereby granted, free of charge, to any person obtaining a copy
of this software and associated documentation files (the "Software"), to deal
in the Software without restriction, including without limitation the rights
to use, copy, modify, merge, publish, distribute, sublicense, and/or sell
copies of the Software, and to permit persons to whom the Software is
furnished to do so, subject to the following conditions:

The above copyright notice and this permission notice shall be included in
all copies or substantial portions of the Software.

THE SOFTWARE IS PROVIDED "AS IS", WITHOUT WARRANTY OF ANY KIND, EXPRESS OR
IMPLIED, INCLUDING BUT NOT LIMITED TO THE WARRANTIES OF MERCHANTABILITY,
FITNESS FOR A PARTICULAR PURPOSE AND NONINFRINGEMENT.  IN NO EVENT SHALL THE
AUTHORS OR COPYRIGHT HOLDERS BE LIABLE FOR ANY CLAIM, DAMAGES OR OTHER
LIABILITY, WHETHER IN AN ACTION OF CONTRACT, TORT OR OTHERWISE, ARISING FROM,
OUT OF OR IN CONNECTION WITH THE SOFTWARE OR THE USE OR OTHER DEALINGS IN
THE SOFTWARE.
This bot allows you to automate your crypto trading strategies on the Solana blockchain. The bot is currently written in JS and uses the Raydium V2 SDK to execute trades.
Basic logics here is listen new pool created in Raydium AMM and if that token matches the filter sets based on the predefined parameters, it executes strategies set by the user.
Simply the bot will periodity calculate the price and if it hits TP/SL or the PRICE_CHECK_DURATION timedout – bot will sell the token
(Because there are many rugged pull here, it’s better to sell tokens before the liquidity is too low, when the amoutOut is too small you can not sell that token anymore, or can’t redeem the rental fee 0.002 SOL by default);
NO REFERAL FEE
❗❗This code doesn’t include or require your fee per transaction. Feel free to use as your own.
Disclaimer
🛑 This bot can lead to loss of your funds, use at your own risk. Start with small amounts and protect your keys.
This Bot is provided as is, for learning purposes.
This bot is provided without any warranty of any kind, express or implied, including but not limited to the warranties of merchantability, fitness for a particular purpose, and non-infringement.
In no event shall the authors be liable for any claim, damages, or other liability.
Trading cryptocurrencies and tokens involves risk, and past performance is not indicative of future results.
The use of this bot is at your own risk, and we are not responsible for any losses incurred while using the bot.
Setup
To run the script you need to:
Create a new empty Solana wallet
Transfer some SOL to it.
Convert some SOL to WSOL (via Jupiter or Raydium).
Install dependencies by typing: npm install
Run the script by typing: npm run start in terminal
Updating .env, Use contents template inside the .env.example. (Check Configuration section bellow).
Configuration
Wallet
PRIVATE_KEY – Your wallet’s private key.
Connection
RPC_ENDPOINT – HTTPS RPC endpoint for interacting with the Solana network.
RPC_WEBSOCKET_ENDPOINT – WebSocket RPC endpoint for real-time updates from the Solana network.
COMMITMENT_LEVEL– The commitment level of transactions (e.g., “finalized” for the highest level of security).
Bot
LOG_LEVEL – Set logging level, e.g., info, debug, trace, etc.
ONE_TOKEN_AT_A_TIME – Set to true to process buying one token at a time.
COMPUTE_UNIT_LIMIT – Compute limit used to calculate fees.
COMPUTE_UNIT_PRICE – Compute price used to calculate fees.
TRANSACTION_EXECUTOR – default or jito
CUSTOM_FEE – If using warp or jito executors this value will be used for transaction fees instead of COMPUTE_UNIT_LIMIT and COMPUTE_UNIT_LIMIT
Minimum value is 0.0001 SOL, but recommend using 0.006 SOL or above
On top of this fee, minimal solana network fee will be applied
WAIT_FOR_RETRY_MS=800 – Wait in ms for each retrying (buy/sell)
Buy
QUOTE_MINT – Which pools to snipe, USDC or WSOL.
QUOTE_AMOUNT – Amount used to buy each new token.
AUTO_BUY_DELAY – Delay in milliseconds before buying a token.
MAX_BUY_RETRIES – Maximum number of retries for buying a token.
BUY_SLIPPAGE – Slippage %
Sell
AUTO_SELL – Set to true to enable automatic selling of tokens.
If you want to manually sell bought tokens, disable this option.
MAX_SELL_RETRIES – Maximum number of retries for selling a token.
AUTO_SELL_DELAY – Delay in milliseconds before auto-selling a token.
PRICE_CHECK_INTERVAL – Interval in milliseconds for checking the take profit and stop loss conditions.
Set to zero to disable take profit and stop loss.
PRICE_CHECK_DURATION – Time in milliseconds to wait for stop loss/take profit conditions.
If you don’t reach profit or loss bot will auto sell after this time.
Set to zero to disable take profit and stop loss.
TAKE_PROFIT – Percentage profit at which to take profit.
Take profit is calculated based on quote mint.
STOP_LOSS – Percentage loss at which to stop the loss.
Stop loss is calculated based on quote mint.
SELL_SLIPPAGE – Slippage %.
Filters
CHECK_IF_MUTABLE – Set to true to buy tokens only if their metadata are not mutable.
CHECK_IF_SOCIALS – Set to true to buy tokens only if they have at least 1 social.
CHECK_IF_MINT_IS_RENOUNCED – Set to true to buy tokens only if their mint is renounced.
CHECK_IF_FREEZABLE – Set to true to buy tokens only if they are not freezable.
CHECK_IF_BURNED – Set to true to buy tokens only if their liquidity pool is burned.
MIN_LP_BURNED_PERCENT – Some tokens only send 1 token to burned, it’s better to calculate burned percent.
MIN_POOL_SIZE – Bot will buy only if the pool size is greater than or equal the specified amount.
Set 0 to disable.
MAX_POOL_SIZE – Bot will buy only if the pool size is less than or equal the specified amount.
Set 0 to disable.
Some tips 👀
🔨 The bot is a Tool, not a holy grail that will make you rich just by running it. If you don’t know what you are doing, you WILL lose money.
RPC / Network speed & good trading strategy is the key to success. You can speed up the bor but disabling AMMS not being used or too slow.
Not everything is so obvious. eg. a larger trade size can lead to smaller profits than a lower trade size.
If you frequently get 429 errors, try to reduce PRICE_CHECK_INTERVAL or FILTER_CHECK_INTERVAL.
If you can’t run the bot, it’s likely something wrong with the network, RPC, or config file
Common issues
If you have an error which is not listed here, please create a new issue in this repository.
To collect more information on an issue, please change LOG_LEVEL to debug.
If you see following error in your log file: Error: 410 Gone: {"jsonrpc":"2.0","error":{"code": 410, "message":"The RPC call or parameters have been disabled."}, "id": "986f3599-b2b7-47c4-b951-074c19842bad" }
it means your RPC node doesn’t support methods needed to execute script.
FIX: Change to use RPC node from some provider such as Helius or QuickNode…
If you see following error in your log file: Error: No SOL token account found in wallet:
it means that wallet you provided doesn’t have USDC/WSOL token account.
To fix it: Go to dex (JUP for example) and swap some SOL to USDC/WSOL (tutorial)
Install the bot on the intended repositories. The plugin requires the following Permissions and Events:
Pull requests: Read & Write
Issues: Read & Write
Create a .github/config.yml file to check for content of the comments:
# Configuration for welcome - https://github.com/behaviorbot/welcome

# Configuration for new-issue-welcome - https://github.com/behaviorbot/new-issue-welcome

# Comment to be posted to on first time issues
newIssueWelcomeComment: >
  Thanks for opening your first issue here! Be sure to follow the issue template!

# Configuration for new-pr-welcome - https://github.com/behaviorbot/new-pr-welcome

# Comment to be posted to on PRs from first time contributors in your repository
newPRWelcomeComment: >
  Thanks for opening this pull request! Please check out our contributing guidelines.

# Configuration for first-pr-merge - https://github.com/behaviorbot/first-pr-merge

# Comment to be posted to on pull requests merged by a first time user
firstPRMergeComment: >
  Congrats on merging your first pull request! We here at behaviorbot are proud of you!

# It is recommended to include as many gifs and emojis as possible!
You can opt out of having the bot comment on first time pull requests, pull request merges, or new issues by not filling in a value for each app’s respective field.
For some inspiration about what kind of content to include in your .github/config files, check out Electron’s Configuration.
Need help?
If you need help using this app, we encourage you to:
Actuarial Standards of Practice (ASOP) Q&A machine using Retrieval Augmented Generation (RAG)
1. Description
This project aims to create a Retrieval-Augmented Generation (RAG) process for actuaries to ask questions on a set of Actuarial Standards of Practice (ASOP) documents. The RAG process utilizes the power of the Large Language Model (LLM) to provide answers to questions on ASOPs.
However, RAG is not without challenges, i.e., hallucination and inaccuracy. The project example allows verifiability by providing the context an LLM used to arrive at those answers. This process enables actuaries to validate the LLM’s answers, empowering them to make informed decisions. By combining the capabilities of LLM with verifiability, this RAG process offers actuaries a robust tool to leverage LLM technology effectively and extract maximum value.
The current example uses OpenAI’s GPT 3.5 turbo and open-source LLMs (e.g., Mistral 7B Instruct, SOLAR 10.7B Instruct). The open-source models can be used locally and can address potential data privacy or security concerns.
Please see a Jupyter notebook (ASOP_RAG.ipynb) for details of the Python codes in the notebook folder. You can choose either Open AI or open-source LLM to use the RAG.
An alternative notebook (ASOP_RAG_compare.ipynb) outputs the responses from both Open AI and an open-source LLM for comparison purposes.
Note: Asking this question to LLMs (such as ChatGPT 4) often leads to hallucination as they often explain the ASOP as if it is not repealed or refer to other ASOP documents.
Note: The RAG provides both the answer and context.
Answer
ASOP No. 14 was reviewed as part of a project to look at all cash flow testing standards of practice, and relevant portions were incorporated into the revisions of ASOP No. 7 and ASOP No. 22. The ASB voted to adopt the revised ASOP No. 7 and ASOP No. 22 and to repeal ASOP No. 14 in September 2001. The effective date of ASOP No. 7 was deferred to July 15, 2002, while concerns were reviewed regarding its applicability to property/casualty practice.
Context
Note: Providing context to the answer allows actuaries to review and validate.
Source 1: ../data/ASOP/asop007_128.pdf, page 5:
virelated to cash flow testing. Finally, the ASB has adopted a new format for standards, and this standard has been rewritten to conform to that new format. In addition to ASOP No. 7, as part of the project to look at all cash flow testing standards of practice, ASOP No. 14 and ASOP No. 22 were al so reviewed. Relevant portions of ASOP No.
14 were incorporated within the 2001 revisions of ASOP No. 7 and ASOP No. 22. At its September 2001 meeting, the ASB voted to adopt the revised ASOP No. 7 and ASOP No. 22 and to repeal ASOP No. 14. In April 2002, the ASB voted to defer the effective date of ASOP No. 7 to July 15, 2002 while it reviewed concerns raised by the Academy’s Casualty Practice Council regarding the standard’s applicability to property/casualty practice. At its June 2002 meeting, the ASB amended the scope to conform to generally accepted casualty actuarial practice. Please see appendix 3 for further information. Exposure Draft
Source 2: ../data/ASOP/asop004_173.pdf, page 31:
are found in the current version of ASOP No. 4. The reviewers believe the reference to Precept 8 remains appropriate. The reviewers do not believe that the proposed change significantly improves the language included in the current version of ASOP No. 4, and made no change.
Source 3: … (all the context not shown in this illustration)
3. Model
3.1 Conceptual Flow
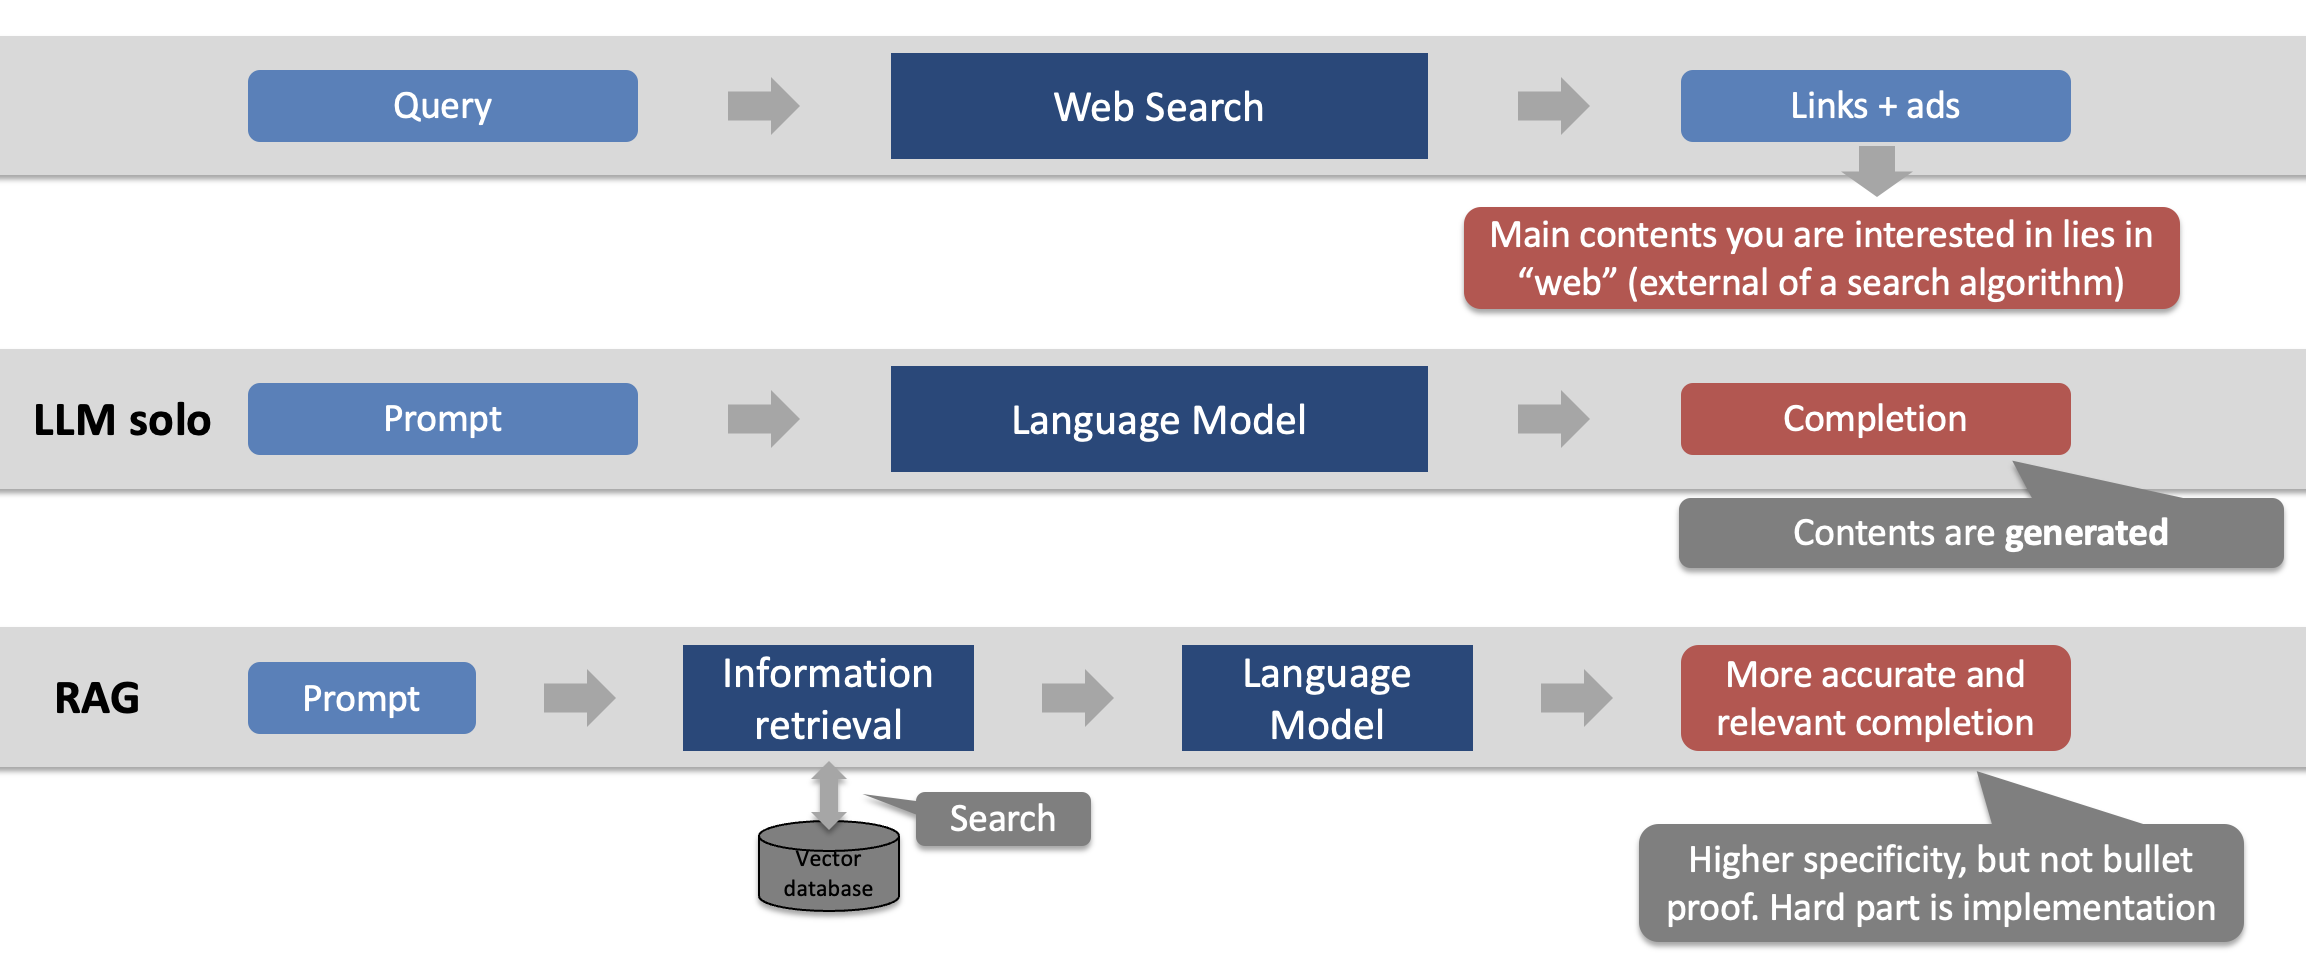
RAG combines search and LLM generations.
LLM completions are the results of model inference based on locked-in parameters. Any knowledge or information from LLM can be outdated unless augmented by external sources. RAG connects external documents, searches the document, and provides the relevant context to LLM. The external documents are transformed into a vector database during the initial setup stage for an effective search.
For applications in practice, one should note that RAG is not perfect and can still lead to errors in searching or generating irrelevant or incorrect responses. As such, verifiability in RAG becomes crucial for actuarial use cases.
3.2 RAG Implementation Steps
1. Decide whether to use OpenAI or local open-source models
2. Select PDF documents (e.g., ASOP) to perform RAG
3. Transform PDF into texts and divide them into chunks
4. Convert the chunks into a vector database (Chroma DB) using embedding models (OpenAI, GPT4All)
5. Retrieve and use LLM (GPT 3.5 Instruct, Solar 10.7B) to generate
6. Output responses and context for a user to verify
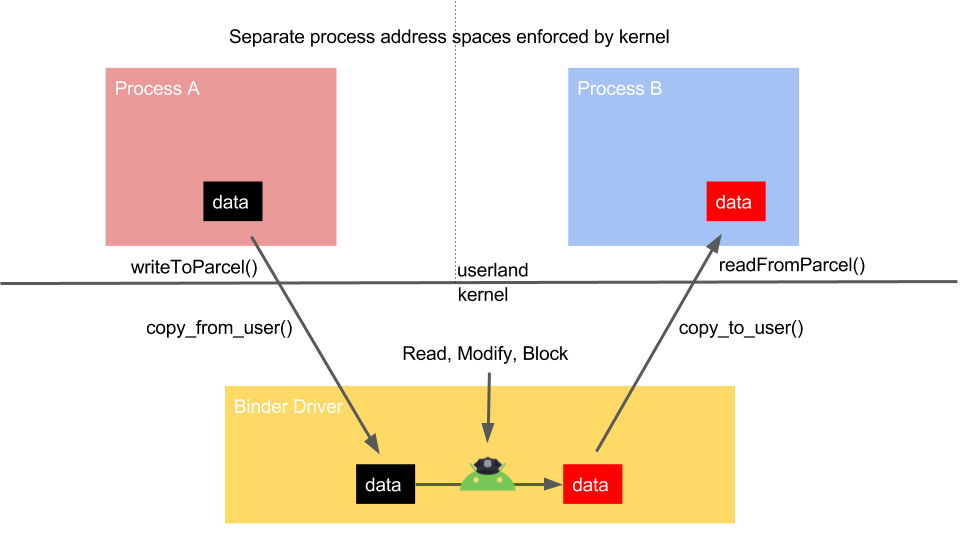
BinderFilter is a Linux kernel message firewall for Android. It is written as a kernel driver that implements reading, blocking, and modifying Android IPC messages. Our BinderFilter kernel driver hooks Android Binder’s kernel driver in /drivers/staging/android/binder.c.
Android’s Binder IPC system completely mediates all inter-application messages, including requests by applications for private user data. We give users control and visibility over all such IPC messages, including dynamic permission blocking, with our open source BinderFilter project. This includes userland filtering, blocking, and logging of any IPC message in Android. Userland policy can be informed by the system’s context, i.e. environmental data such as GPS location and wifi network, which addresses the current lack of native Android support for context-based security policies.
Parsing
BinderFilter parses kernel IPC messages, which are often unencrpyted and assumed by applications to be secure – as demonstrated here. These messages include Intents sent to system services, and Intents to start new activities. An example IPC message from the GPS system service is shown below.
Because we hook an existing Linux driver, BinderFilter code requires a recompilation of the Linux source tree and flashing this new kernel onto an Android phone. We have tested and verified this method on a Google Nexus 7 (2013- flo). For development setup, see the related documentation. To install the pre-compiled kernel image:
Root your Android phone
Enable USB debugging
Unlock bootloader
Download fastboot and adb
Connect your phone to the laptop with USB debugging enabled
Picky is the Android application that allows users to set firewall policy. See github.com/dxwu/Picky.
Presentations
This project has been presented at Summercon 2016 and Shmoocon 2017.
Contributors
This project started as a Senior Honors Thesis at Dartmouth College. Sergey Bratus advised and designed the project, and David Wu is the main contributer. Ionic Security has provided funding for testing phones and tablets.
To group this repository with other related repositories in the future we lately transferred this repository to the freshly created organization cupybara.
Therefore we changed the package names from com.github.hakenadu to io.github.cupybara and also changed the groupId.
The latest artifact is therefore available by using the following dependency:
Packages up to version 0.5.0 are available using the groupId com.github.hakenadu.
These artifacts are not updates anymore so we don’t suggest to use them.
Please switch to io.github.cupybara.
Modular components implement the Chain interface.
This provides an easy way to modularize the application and enables us to reuse them for various use cases.
This section describes the usage of all chains that are currently available.
Base
Logging
The LoggingChain can be used to log the previous chain’s output.
Take a look at the RetrievalQaTest to see some example usages (logging chains indented for improved readability):
The summarizeDocumentsChain in this example provides a Stream as an output. To log each item of the Stream the LoggingChain can be wrapped in an
ApplyToStreamInputChain.
This example provides the following log output running the RetrievalQaTest:
========================================================================================================================================================
SUMMARIZED_DOCUMENT
========================================================================================================================================================
{source=book-of-john-1.pdf, question=who is john doe?, content=John Doe is a highly skilled and experienced software engineer with a passion for problem-solving and creating innovative solutions. He has been working in the technology industry for over 15 years and has gained a reputation for his exceptional programming abilities and attention to detail.}

========================================================================================================================================================
SUMMARIZED_DOCUMENT
========================================================================================================================================================
{source=book-of-john-3.pdf, question=who is john doe?, content=John Doe is described as someone with a diverse range of hobbies and interests. Some of his notable hobbies include music production, culinary adventures, photography and travel, fitness and outdoor activities, and being a book club enthusiast. He is also involved in volunteering and community service, language learning, gardening, DIY projects, and astronomy.}

========================================================================================================================================================
COMBINED_DOCUMENT
========================================================================================================================================================
{question=who is john doe?, content=Content: John Doe is described as someone with a diverse range of hobbies and interests. Some of his notable hobbies include music production, culinary adventures, photography and travel, fitness and outdoor activities, and being a book club enthusiast. He is also involved in volunteering and community service, language learning, gardening, DIY projects, and astronomy.
Source: book-of-john-3.pdf

Content: John Doe is a highly skilled and experienced software engineer with a passion for problem-solving and creating innovative solutions. He has been working in the technology industry for over 15 years and has gained a reputation for his exceptional programming abilities and attention to detail.
Source: book-of-john-1.pdf}

========================================================================================================================================================
LLM_RESULT
========================================================================================================================================================
John Doe is described as someone with a diverse range of hobbies and interests, including music production, culinary adventures, photography, travel, fitness, outdoor activities, being a book club enthusiast, volunteering, community service, language learning, gardening, DIY projects, and astronomy. Additionally, John Doe is a highly skilled and experienced software engineer with a passion for problem-solving and creating innovative solutions. He has been working in the technology industry for over 15 years and is known for his exceptional programming abilities and attention to detail.
SOURCES: book-of-john-3.pdf, book-of-john-1.pdf
InMemoryPdfinMemoryPdf = newInMemoryPdf(
IOUtils.toByteArray(ReadDocumentsFromInMemoryPdfChainTest.class.getResourceAsStream("/pdf/qa/book-of-john-3.pdf")),
"my-in-memory.pdf");
Stream<Map<String, String>> readDocuments = newReadDocumentsFromInMemoryPdfChain().run(inMemoryPdf)
// the readDocuments contains a (pdfContent, "my-in-memory.pdf") pair
Read documents for each page of the in memory pdf
InMemoryPdfinMemoryPdf = newInMemoryPdf(
IOUtils.toByteArray(ReadDocumentsFromInMemoryPdfChainTest.class.getResourceAsStream("/pdf/qa/book-of-john-3.pdf")),
"my-in-memory.pdf");
Stream<Map<String, String>> readDocuments = newReadDocumentsFromInMemoryPdfChain(PdfReadMode.PAGES).run(inMemoryPdf)
// the readDocuments contains (content, source) pairs for all read pdf pages (source is "my-in-memory.pdf" + the pdf page number)
Read each pdf in the given directory into a single document each
Stream<Map<String, String>> readDocuments = newReadDocumentsFromPdfChain()
.run(Paths.get("path/to/my/pdf/folder"))
// the readDocuments contains (content, source) pairs for all read pdfs (source is the pdf filename)
Read each page of each pdf in the given directory into a single document each
Stream<Map<String, String>> readDocuments = newReadDocumentsFromPdfChain(PdfReadMode.PAGES)
.run(Paths.get("path/to/my/pdf/folder"))
// the readDocuments contains (content, source) pairs for all read pdf pages (source is the pdf filename + the pdf page number)
RestClientBuilderrestClientBuilder = RestClient.builder(newHttpHost("localhost", 9200));
Chain<Path, Void> createElasticsearchIndexChain = newReadDocumentsFromPdfChain()
.chain(newWriteDocumentsToElasticsearchIndexChain("my-index", restClientBuilder));
PathpdfDirectoryPath = Paths.get(ElasticsearchRetrievalChainTest.class.getResource("/pdf/qa").toURI());
// create and fill elasticsearch index with read pdfs (source, content)-pairscreateElasticsearchIndexChain.run(pdfDirectoryPath);
// retrieve documents relevant to a specific questiontry (RestClientrestClient = restClientBuilder.build();
ElasticsearchRetrievalChainretrievalChain = newElasticsearchRetrievalChain("my-index", restClient, 1)) {
// retrieve the most relevant documents for the passed questionStream<Map<String, String>> retrievedDocuments = retrievalChain.run("who is john doe?").collect(Collectors.toList());
// ...
}
RestClientBuilderrestClientBuilder = RestClient.builder(newHttpHost("localhost", 9200));
// this chain reads documents from a folder of pdfs and writes them to an elasticsearch indexChain<Path, Void> fillElasticsearchIndexChain = newReadDocumentsFromPdfChain()
.chain(newWriteDocumentsToElasticsearchIndexChain("my-index", restClientBuilder));
PathpdfDirectoryPath = Paths.get(getClass().getResource("/pdf/qa").toURI());
fillElasticsearchIndexChain.run(pdfDirectoryPath);
Write Documents to Lucene Directory
PathtempIndexPath = Files.createTempDirectory("lucene")
// this chain reads documents from a folder of pdfs and writes them to an index directoryChain<Path, Directory> createLuceneIndexChain = newReadDocumentsFromPdfChain()
.chain(newWriteDocumentsToLuceneDirectoryChain(tempIndexPath));
PathpdfDirectoryPath = Paths.get(getClass().getResource("/pdf/qa").toURI());
Directorydirectory = createLuceneIndexChain.run(pdfDirectoryPath);
AzureOpenAiChatCompletionsChainchain = newAzureOpenAiChatCompletionsChain(
"my-azure-resource-name",
"gpt-35-turbo", // deployment name"2023-05-15", // api version"Hello, this is ${name}",
newOpenAiChatCompletionsParameters().temperature(0D), // also allows to set more parametersSystem.getenv("OPENAI_API_KEY"),
"You are a helpful assistant who answers questions to ${name}"// optional systemTemplate
);
Stringresult = chain.run(Collections.singletonMap("name", "Manuel"));
// the above outputs something like: "Hello Manuel, how are you"
Azure Completions
AzureOpenAiCompletionsChainchain = newAzureOpenAiCompletionsChain(
"my-azure-resource-name",
"text-davinci-003", // deployment name"2023-05-15", // api version"Hello, this is ${name}",
newOpenAiCompletionsParameters().temperature(0D), // also allows to set more parametersSystem.getenv("OPENAI_API_KEY"),
"You are a helpful assistant who answers questions to ${name}"// optional systemTemplate
);
Stringresult = chain.run(Collections.singletonMap("name", "Manuel"));
// the above outputs something like: "Hello Manuel, how are you"
OpenAiChatCompletionsChainchain = newOpenAiChatCompletionsChain(
"Hello, this is ${name}",
newOpenAiChatCompletionsParameters().model("gpt-3.5-turbo").temperature(0D), // also allows to set more parametersSystem.getenv("OPENAI_API_KEY"),
"You are a helpful assistant who answers questions to ${name}"// optional systemTemplate
);
Stringresult = chain.run(Collections.singletonMap("name", "Manuel"));
// the above outputs something like: "Hello Manuel, how are you"
OpenAI Completions
OpenAiCompletionsChainchain = newOpenAiCompletionsChain(
"Hello, this is ${name}",
newOpenAiCompletionsParameters().model("text-davinci-003").temperature(0D), // also allows to set more parametersSystem.getenv("OPENAI_API_KEY"),
"You are a helpful assistant who answers questions to ${name}"// optional systemTemplate
);
Stringresult = chain.run(Collections.singletonMap("name", "Manuel"));
// the above outputs something like: "Hello Manuel, how are you"
QA
Modify Documents
The ModifyDocumentsContentChain can be used for document summarization (for example).
// create the llm chain which is used for summarizationLargeLanguageModelChainllmChain = newOpenAiChatCompletionsChain(
PromptTemplates.QA_SUMMARIZE,
newOpenAiChatCompletionsParameters().temperature(0D).model("gpt-3.5-turbo"),
System.getenv("OPENAI_API_KEY"));
// create the ModifyDocumentsContentChain which is used to apply the llm chain to each passed documentModifyDocumentsContentChainsummarizeDocumentsChain = newModifyDocumentsContentChain(llmChain);
// create some example documentsMap<String, String> myFirstDocument = newHashMap<String, String>();
myFirstDocument.put(PromptConstants.CONTENT, "this is my first document content");
myFirstDocument.put(PromptConstants.SOURCE, "this is my first document source");
// the default summarize prompt PromptTemplates.QA_SUMMARIZE also expects the question used for retrieval in the documentmyFirstDocument.put(PromptConstants.QUESTION, "who is John Doe?");
Map<String, String> mySecondDocument = newHashMap<String, String>();
mySecondDocument.put(PromptConstants.CONTENT, "this is my second document content");
mySecondDocument.put(PromptConstants.SOURCE, "this is my second document source");
mySecondDocument.put(PromptConstants.QUESTION, "how old is John Doe?"); // see comment above// input for the summarize chain is a stream of documentsStream<Map<String, String>> documents = Stream.of(myFirstDocument, mySecondDocument);
// output contains the passed documents with summarized content-ValueStream<Map<String, String>> summarizedDocuments = summarizeDocumentsChain.run(documents);
Combine Documents
CombineDocumentsChaincombineDocumentsChain = newCombineDocumentsChain();
Map<String, String> myFirstDocument = newHashMap<String, String>();
myFirstDocument.put(PromptConstants.CONTENT, "this is my first document content");
myFirstDocument.put(PromptConstants.SOURCE, "this is my first document source");
Map<String, String> mySecondDocument = newHashMap<String, String>();
mySecondDocument.put(PromptConstants.CONTENT, "this is my second document content");
mySecondDocument.put(PromptConstants.SOURCE, "this is my second document source");
Stream<Map<String, String>> documents = Stream.of(myFirstDocument, mySecondDocument);
Map<String, String> combinedDocument = combineDocumentsChain.run(documents);
/* * Content: this is my first document content * Source: this is my first document source * * Content: this is my second document content * Source: this is my second document source * * (stored with key "content" inside the map) */
Map LLM results to answers with sources
MapAnswerWithSourcesChainmapAnswerWithSourcesChain = newMapAnswerWithSourcesChain();
AnswerWithSourcesanswerWithSources = mapAnswerWithSourcesChain.run("The answer is bla bla bla.\nSOURCES: page 1 book xy, page 2 book ab");
System.out.println(answerWithSources.getAnswer()); // The answer is bla bla bla.System.out.println(answerWithSources.getSources()); // [page 1 book xy, page 2 book ab]
// 1. Create DocumentsList<Map<String, String>> documents = newLinkedList<>();
Map<String, String> firstDocument = newLinkedHashMap<>();
firstDocument.put(PromptConstants.SOURCE, "book of john");
firstDocument.put(PromptConstants.CONTENT, "This is a short text. This is another short text.");
documents.add(firstDocument);
Map<String, String> secondDocument = newLinkedHashMap<>();
secondDocument.put(PromptConstants.SOURCE, "book of jane");
secondDocument.put(PromptConstants.CONTENT, "This is a short text.");
documents.add(secondDocument);
// 2. Split Documents/* * We create a TextSplitter that splits a text into partitions using a JTokkit * Encoding. We use the cl100k_base encoding (which btw is the default for * gpt-3.5-turbo) */TextSplittertextSplitter = newJtokkitTextSplitter(
Encodings.newDefaultEncodingRegistry().getEncoding(EncodingType.CL100K_BASE), 10);
/* * we now instantiate the SplitDocumentsChain which will split our documents * using the above created TextSplitter on the "content" field. */SplitDocumentsChainsplitDocumentsChain = newSplitDocumentsChain(textSplitter);
List<Map<String, String>> splitDocuments = splitDocumentsChain.run(documents.stream())
.collect(Collectors.toList());
// splitDocuments: [// {content=This is a short text. , source=book of john},// {content=This is another short text., source=book of john},// {content=This is a short text., source=book of jane}// ]
Usage behind a corporate proxy
If a chain needs to access to an external service, there will be a constructor parameter for passing the http client.
The WebClient is used for the following chains:
Multiple chains can be chained together to create more powerful chains for complex use cases.
Document Comparison
The following unit test shows how the existing chains may be used to compare 2 or more documents.
I guess more abstraction would be useful. I will target that in one of the next releases and then also include example code in this README.
The following diagram shows how the implementation for this usecase works:
Retrieval Question-Answering Chain
The following unit test provides a comprehensive solution for an information retrieval and summarization task, with the aim to provide concise, informative and relevant answers from a large set of documents. It combines multiple processes into a Question-Answering (QA) chain, each responsible for a specific task.
/* * take a look at src/test/resources/pdf of this repository * the pdf directory contains three documents about a fictional person named john doe * which we want to query using our retrieval based qa with sources chain */PathpdfDirectoryPath = Paths.get(RetrievalQaTest.class.getResource("/pdf/qa").toURI());
/* * We are creating and running an initializing chain which reads document from our pdf folder * and writes them to a lucene index directory */Directorydirectory = newReadDocumentsFromPdfChain().chain(newWriteDocumentsToLuceneDirectoryChain()).run(pdfDirectoryPath);
// we got multiple OpenAI LLM Chains and define our parameters at firstOpenAiChatCompletionsParametersopenAiChatParameters = newOpenAiChatCompletionsParameters()
.temperature(0D)
.model("gpt-3.5-turbo");
/* * Chain 1: The retrievalChain is used to retrieve relevant documents from an * index by using bm25 similarity */try (LuceneRetrievalChainretrievalChain = newLuceneRetrievalChain(directory/* implies a filled lucene directory */, 2)) {
/* * Chain 2: The summarizeDocumentsChain is used to summarize documents to only * contain the most relevant information. This is achieved using an OpenAI LLM * (gpt-3.5-turbo in this case) */ModifyDocumentsContentChainsummarizeDocumentsChain = newModifyDocumentsContentChain(newOpenAiChatCompletionsChain(
PromptTemplates.QA_SUMMARIZE, openAiChatParameters, System.getenv("OPENAI_API_KEY")));
/* * Chain 3: The combineDocumentsChain is used to combine the retrieved documents * in a single prompt */CombineDocumentsChaincombineDocumentsChain = newCombineDocumentsChain();
/* * Chain 4: The openAiChatChain is used to process the combined prompt using an * OpenAI LLM (gpt-3.5-turbo in this case) */OpenAiChatCompletionsChainopenAiChatChain = newOpenAiChatCompletionsChain(PromptTemplates.QA_COMBINE,
openAiChatParameters, System.getenv("OPENAI_API_KEY"));
/* * Chain 5: The mapAnswerWithSourcesChain is used to map the llm string output * to a complex object using a regular expression which splits the sources and * the answer. */MapAnswerWithSourcesChainmapAnswerWithSourcesChain = newMapAnswerWithSourcesChain();
// we combine all chain links into a self contained QA chainChain<String, AnswerWithSources> qaChain = retrievalChain
.chain(summarizeDocumentsChain)
.chain(combineDocumentsChain)
.chain(openAiChatChain)
.chain(mapAnswerWithSourcesChain);
// the QA chain can now be called with a question and delivers an answerAnswerWithSourcesanswerWithSources = qaChain.run("who is john doe?");
/* * answerWithSources.getAnwswer() provides the answer to the question based on the retrieved documents * answerWithSources.getSources() provides a list of source strings for the retrieved documents */
}
The QA chain performs the following tasks:
Document Retrieval: This step is responsible for retrieving the most relevant documents related to a given query from a large collection. It uses an index-based search algorithm to find documents containing information related to the input query. This functionality can be facilitated by any RetrievalChain implementation. LuceneRetrievalChain, which utilizes the BM25 similarity metric, is just an example used in the test case.
Document Summarization: Once relevant documents are retrieved, they need to be summarized to extract the most essential information. The SummarizeDocumentsChain uses an instance of LargeLanguageModelChain for this task. In the provided example, OpenAI’s GPT-3.5-turbo model via OpenAiChatCompletionsChain is used to reduce the information to its most relevant content.
Document Combination: The CombineDocumentsChain combines the summarized documents into a single prompt. This forms the input to the next stage of the process.
Answer Generation: The OpenAiChatCompletionsChain uses the combined prompt to generate a response. Any instance of LargeLanguageModelChain can be used for this step. In the given example, OpenAI’s GPT-3.5-turbo model is utilized.
Mapping and Answer Extraction: Finally, the MapAnswerWithSourcesChain maps the string output to a complex object using a regular expression, which splits the answer from the sources of information. This provides a structured output that includes both the answer to the query and the sources from which the answer was derived.
In conclusion, the QA chain represents a comprehensive solution for document-based question-answering tasks, providing not only the most relevant answer but also citing the sources from which the information was retrieved. This chain is particularly useful in contexts where understanding the origin of information is as crucial as the answer itself.
The LabVIEW driver for YUDIAN Artificial Intelligence Temperature Controller, used by many automatic controlled furnaces (e.g. furnaces made by MTI Corp.) You may use this driver to easily integrate your smart furnaces into your process control software and fabrication workflow.
Contribution
I developed this driver during my spare time when I was still working on electronics packaging and semiconductor fabrication. The driver was originally shared on NI forum but not very accessible.
You are welcome to make contributions to this repo by creating an issue or pull-request. I will review them every month and maintain this repo with my best efforts.
Usage
This is a third-party LabVIEW driver for RS485 communication bus. MIT license.
VISA API
If you have a VISA time-out problem. This is how to debug it:
First use its official software and see if it works, if so, it indicates the software problem, otherwise, you have the hardware problem.
You also need check with your controller, it has to allow the remote control mode or it supports remote control.
If you are using the right cable and the official software comes with the controller does work, you need use a serial port communication monitor software to monitor all the communication on the serial port and carefully compare it to the communication log data with official software. I use this tool
It is free while I was debugging this. Once you find the difference between this driver and the official one, revise the code according to the official protocol and it shall work. You may contribute your update this repo and it could benefit everyone.
It might because that YUDIAN recently upgrade the firmware of AI-508 and the existing driver no longer works. If so, you may debug this version and update to the new version. And you are welcome to upload your revision to share with other engineers.
RS485 Bus
I recommend to use a generic USB/RS485 converter. This driver only supports RS485 protocol. This is NOT RS232. if you use most common RS232, it won’t work.
To configure the RS485, you need setup it according to the user manual of your converter and your PC. Then, if you have multiple devices on the RS485 bus, make sure that you choose the correct address, e.g. You need to use the corresponding address number in every sub vi.
Programming
You may setup the number of steps/segments in your controller program. You also need to set the temperatures and time for each segment. You can also download current program from the controller to double check it.
While your program is running, you may use a while loop (or a thread) to get the real-time temperature reading periodically and integrate it with any other control logic.
All those sub vi, you can find in the sub folder and they have been tested. You may stop the program using stop vi. In all, go thru the source code first, you will find the driver is straightforward and easy to understand and use.


 https://github.com/maattss/tdt4242-agreelance